Kernel of Truth

Category: Linux

  • Puppet

    Automating Infrastructure at Scale

    Introduction

    In modern IT environments, speed, consistency, and security are crucial. Manual server configuration is slow and error-prone, especially when managing hundreds or thousands of machines. Puppet provides a way to automate these tasks, ensuring infrastructure is configured, deployed, and maintained reliably.

    Puppet is widely used by DevOps, SecOps, and Cloud teams to enforce policies and manage servers across hybrid and multi-cloud environments.


    What is Puppet?

    Puppet is a configuration management and automation tool. It lets you:

    • Describe infrastructure as code.
    • Automatically enforce configurations on servers.
    • Apply updates and security patches consistently.
    • Scale from one server to tens of thousands.

    Instead of running commands one by one, Puppet makes sure every server matches the state you describe.


    Why You Would Use Puppet

    • Infrastructure as Code (IaC) – treat servers like code, making them versionable and repeatable.
    • Compliance and Security – enforce firewall rules, audit settings, and password policies.
    • Reduced Human Error – less manual intervention = fewer mistakes.
    • Multi-Platform Support – manage Linux, Windows, cloud VMs, and containers.
    • Faster Deployments – speed up application rollouts by automating dependencies.

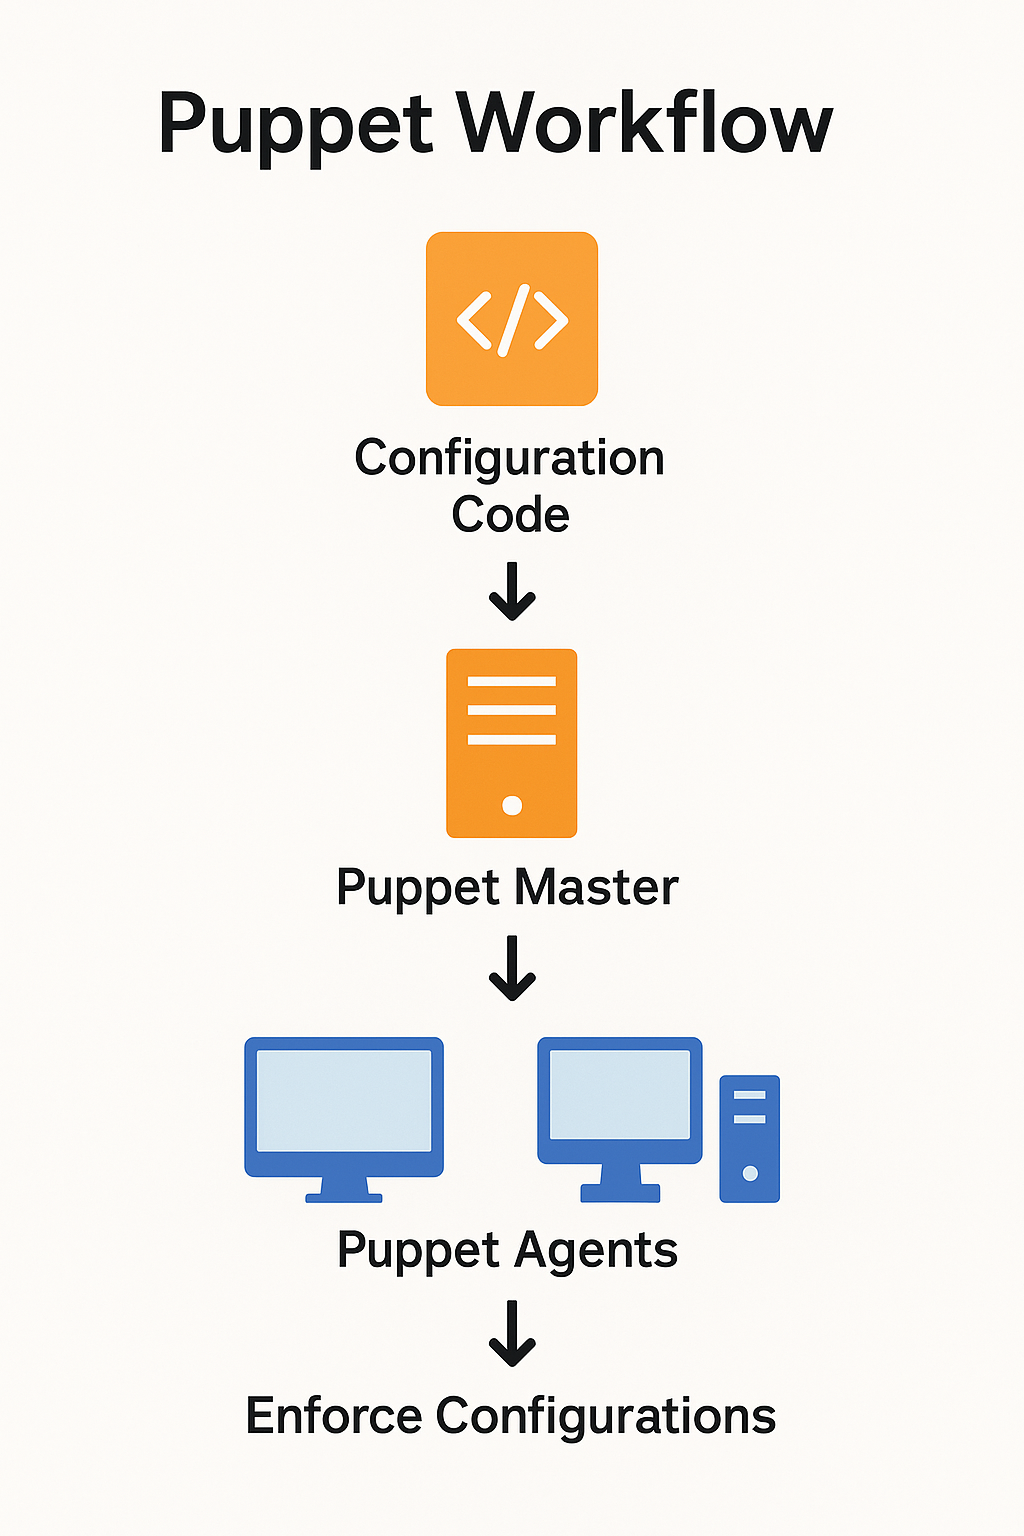
    Puppet Architecture Explained

    Puppet uses a client-server model.

    • Puppet Master (Server): Holds the configuration (catalogs) written in Puppet DSL.
    • Puppet Agent (Node): Runs on each server to apply the configuration.
    • Communication: Agents request their configuration from the Master over HTTPS.

    Diagram: Puppet Master sends configuration catalogs to Puppet Agents across servers.


    Writing Puppet Code (Manifests)

    Puppet uses its own Domain-Specific Language (DSL), which is human-readable.

    Example 1: Installing Nginx

    package { 'nginx':
      ensure => installed,
    }
    
    service { 'nginx':
      ensure => running,
      enable => true,
      require => Package['nginx'],
    }
    

    This ensures:

    • Nginx is installed.
    • The service is enabled and running.

    Example 2: Managing a File

    file { '/etc/motd':
      ensure  => file,
      content => "Welcome to your Puppet-managed server!",
    }
    

    This creates a custom message of the day file.


    Advanced Puppet Examples

    Deploying a LAMP Stack

    package { ['apache2','mysql-server','php']:
      ensure => installed,
    }
    
    service { 'apache2':
      ensure => running,
      enable => true,
    }
    
    service { 'mysql':
      ensure => running,
      enable => true,
    }
    

    This installs and runs Apache, MySQL, and PHP automatically across all your web servers.

    Enforcing Security Policies

    file_line { 'password_policy':
      path  => '/etc/login.defs',
      line  => 'PASS_MAX_DAYS   90',
      match => '^PASS_MAX_DAYS',
    }
    

    This ensures passwords must be changed every 90 days.


    Real-World Use Cases

    • Cloud Deployments – Configure AWS, Azure, and GCP servers at scale.
    • Patch Management – Automate security updates for OS and software.
    • Enterprise Compliance – Enforce CIS, NIST, or company-specific hardening.
    • CI/CD Pipelines – Puppet integrates with Jenkins, GitLab, and other CI/CD tools.
    • Disaster Recovery – Rebuild infrastructure quickly from Puppet code.

    Puppet vs Other Tools

    FeaturePuppetAnsibleChefSaltStack
    ApproachDeclarativeDeclarative + ImperativeDeclarativeEvent-driven + Declarative
    Agentless?❌ Requires agent✅ Yes❌ Requires agent✅ Optional
    Best ForLarge enterprises, complianceFast start, smaller setupsComplex deploymentsReal-time automation
    LanguagePuppet DSLYAMLRuby DSLYAML + Python

    Benefits of Using Puppet

    ✅ Consistency across environments (Dev, Test, Prod)
    ✅ Less downtime caused by misconfigurations
    ✅ Audit trail of every change
    ✅ Faster onboarding of new systems
    ✅ Proven tool with a large community and enterprise support


    Puppet in Security Operations

    For security-focused teams, Puppet can:

    • Automatically deploy and manage endpoint agents (CrowdStrike, Taegis, etc.).
    • Enforce firewall rules across hundreds of servers.
    • Roll out critical CVE patches immediately.
    • Maintain golden images for compliance checks.

    Getting Started with Puppet

    1. Install Puppet on a Linux system.
    2. Define your first manifest.
    3. Apply it to an agent node.
    4. Expand into managing packages, services, and files.
    5. Scale to infrastructure-wide automation.

    For beginners, Puppet Bolt (agentless mode) is also available for simpler automation.


    Summary

    Puppet is a mature, enterprise-grade automation tool that brings order, speed, and consistency to IT operations. Whether you’re managing 10 servers or 10,000, Puppet helps enforce security, deploy applications, and eliminate manual configuration drift.

  • Security Hardening RHEL Linux

    Security Hardening RHEL Linux

    Red Hat Enterprise Linux (RHEL) is widely used in enterprises and datacentres. Out of the box it is secure, but further hardening is recommended for production and internet-facing deployments. This guide covers practical steps to harden a RHEL server (8/9).


    Quick take

    • Goal: Reduce attack surface, enforce least privilege, and improve resilience.
    • Approach: Keep packages updated, configure secure authentication, enforce SELinux, and audit activity.
    • Scope: Applies to RHEL 8 and RHEL 9 (also compatible with CentOS Stream and Rocky/AlmaLinux).

    1. Keep the system updated

    sudo dnf update -y
    

    Enable automatic updates for security patches:

    sudo dnf install dnf-automatic -y
    sudo systemctl enable --now dnf-automatic.timer
    

    2. User accounts and SSH

    • Disable root SSH login.
    • Use SSH keys instead of passwords.
    • Restrict login to specific users.
    # /etc/ssh/sshd_config
    PermitRootLogin no
    PasswordAuthentication no
    AllowUsers adminuser ansible
    
    sudo systemctl reload sshd
    

    3. Firewall and SELinux

    RHEL uses firewalld and SELinux for strong access control.

    # Firewall
    sudo systemctl enable firewalld
    sudo systemctl start firewalld
    sudo firewall-cmd --set-default-zone=public
    sudo firewall-cmd --permanent --add-service=ssh
    sudo firewall-cmd --permanent --add-service=http
    sudo firewall-cmd --permanent --add-service=https
    sudo firewall-cmd --reload
    
    # SELinux status
    getenforce
    # Enforce mode (recommended)
    sudo setenforce 1
    

    Tip: Keep SELinux enforcing. If an app misbehaves, adjust policy with audit2allow instead of disabling SELinux.


    4. Remove unnecessary packages

    Reduce attack surface by removing unused software.

    sudo dnf remove -y telnet rsh-server ypbind tftp-server xinetd
    sudo dnf autoremove -y
    

    5. Logging and auditing

    Enable audit framework and log collection.

    sudo dnf install audit audit-libs -y
    sudo systemctl enable auditd
    sudo systemctl start auditd
    

    Example audit rule (log access to /etc/shadow):

    echo "-w /etc/shadow -p wa -k shadow_changes" | sudo tee -a /etc/audit/rules.d/hardening.rules
    sudo augenrules --load
    

    6. Minimise services

    systemctl list-unit-files --state=enabled
    sudo systemctl disable avahi-daemon
    sudo systemctl disable cups
    

    Only enable the services you actually need.


    7. SELinux and Mandatory Access Control

    SELinux is the default MAC system on RHEL and should always remain enabled.

    sestatus
    # Example: put a service into permissive mode temporarily
    sudo semanage permissive -a httpd_t
    # Generate policy module from AVC denials
    sudo ausearch -m avc -ts recent | audit2allow -M mypol
    sudo semodule -i mypol.pp
    

    8. Kernel and sysctl hardening

    Apply secure kernel parameters via /etc/sysctl.d/:

    # /etc/sysctl.d/99-hardening.conf
    net.ipv4.conf.all.rp_filter=1
    net.ipv4.conf.all.accept_source_route=0
    net.ipv4.conf.all.accept_redirects=0
    net.ipv4.conf.all.log_martians=1
    net.ipv6.conf.all.accept_redirects=0
    kernel.randomize_va_space=2
    

    Apply changes: sudo sysctl -p /etc/sysctl.d/99-hardening.conf


    9. Filesystem protections

    • Use nodev, nosuid, noexec mount options for temporary and removable filesystems.
    # /etc/fstab example
    tmpfs /tmp tmpfs defaults,noexec,nosuid,nodev 0 0
    

    10. Security scanning and compliance

    • SCAP Security Guide (SSG): RHEL provides tailored CIS/NIST profiles.
    sudo dnf install scap-security-guide -y
    oscap xccdf eval --profile xccdf_org.ssgproject.content_profile_cis /usr/share/xml/scap/ssg/content/ssg-rhel9-ds.xml
    
    • Lynis: Auditing and hardening suggestions.
    sudo dnf install epel-release -y
    sudo dnf install lynis -y
    sudo lynis audit system
    

    11. Monitoring and intrusion detection

    • Enable fail2ban to block brute-force SSH:
    sudo dnf install fail2ban -y
    sudo systemctl enable fail2ban
    sudo systemctl start fail2ban
    
    • Consider AIDE or OSSEC for file integrity monitoring.
    sudo dnf install aide -y
    sudo aide --init
    mv /var/lib/aide/aide.db.new.gz /var/lib/aide/aide.db.gz
    

    Summary

    Hardening RHEL Linux involves:

    • Regular patching with dnf and automation.
    • Securing accounts and SSH.
    • Using firewalld and SELinux together for access control.
    • Auditing and minimising running services.
    • Applying kernel/sysctl tunings and filesystem restrictions.
    • Running compliance scans (SCAP, Lynis) and monitoring for intrusions.

    Combine these measures with enterprise tools (Red Hat Satellite, Insights, Ansible Automation Platform) for large-scale enforcement and compliance reporting.

  • Security Hardening Ubuntu Linux

    Security Hardening Ubuntu Linux

    Ubuntu is one of the most popular Linux distributions, widely used in servers, desktops, and cloud environments. Out of the box, it is reasonably secure, but additional hardening is essential for production and internet-facing systems. This page covers practical steps to harden an Ubuntu server.


    Quick take

    • Goal: Reduce attack surface, enforce least privilege, and improve resilience.
    • Approach: Patch promptly, minimise services, enforce strong authentication, monitor activity, and use hardening tools.
    • Scope: Applies to Ubuntu Server LTS releases (20.04/22.04/24.04).

    1. Keep the system updated

    sudo apt update && sudo apt upgrade -y
    sudo apt install unattended-upgrades apt-listchanges
    sudo dpkg-reconfigure --priority=low unattended-upgrades
    

    Tip: Enable unattended-upgrades for security patches, but still review logs regularly.


    2. User accounts and SSH

    • Disable direct root login.
    • Use SSH keys instead of passwords.
    • Restrict access to specific users and IPs.
    # /etc/ssh/sshd_config
    PermitRootLogin no
    PasswordAuthentication no
    AllowUsers ansible adminuser
    

    Reload SSH after changes: sudo systemctl reload ssh


    3. Firewall and network

    Ubuntu ships with ufw (Uncomplicated Firewall):

    sudo ufw default deny incoming
    sudo ufw default allow outgoing
    sudo ufw allow OpenSSH
    sudo ufw allow 80/tcp
    sudo ufw allow 443/tcp
    sudo ufw enable
    sudo ufw status verbose
    

    Tip: For complex setups use nftables or iptables directly.


    4. Remove unnecessary packages

    Reduce attack surface by uninstalling software you don’t need.

    sudo apt remove --purge telnet rsh-server xinetd rpcbind -y
    sudo apt autoremove -y
    

    5. Logging and auditing

    Enable system auditing with auditd:

    sudo apt install auditd audispd-plugins
    sudo systemctl enable auditd
    sudo systemctl start auditd
    

    Example audit rule (log access to /etc/passwd):

    echo "-w /etc/passwd -p wa -k passwd_changes" | sudo tee -a /etc/audit/rules.d/hardening.rules
    sudo augenrules --load
    

    6. Minimise services and daemons

    systemctl list-unit-files --state=enabled
    sudo systemctl disable avahi-daemon
    sudo systemctl disable cups
    

    Rule of thumb: if you don’t use it, disable it.


    7. Mandatory Access Control

    Ubuntu supports AppArmor by default.

    sudo aa-status
    sudo apt install apparmor-utils
    sudo aa-enforce /etc/apparmor.d/*
    

    Use AppArmor profiles for web servers, databases, and custom applications.


    8. Kernel and sysctl hardening

    Adjust kernel parameters for better security. Edit /etc/sysctl.conf or drop files into /etc/sysctl.d/:

    # /etc/sysctl.d/99-hardening.conf
    net.ipv4.conf.all.rp_filter=1
    net.ipv4.conf.all.accept_source_route=0
    net.ipv4.conf.all.accept_redirects=0
    net.ipv4.conf.all.log_martians=1
    net.ipv6.conf.all.accept_redirects=0
    kernel.randomize_va_space=2
    

    Apply changes: sudo sysctl -p


    9. Filesystem protections

    • Mount /tmp, /var/tmp with noexec,nosuid,nodev.
    • Enable nodev on removable storage.
    # /etc/fstab example
    tmpfs   /tmp        tmpfs   defaults,noexec,nosuid,nodev 0 0
    

    10. Automated hardening and scanning tools

    • Lynis – auditing and hardening suggestions:
    sudo apt install lynis
    sudo lynis audit system
    
    • OpenSCAP – compliance scanning (CIS/NIST profiles):
    sudo apt install libopenscap8 openscap-utils
    oscap xccdf eval --profile xccdf_org.ssgproject.content_profile_cis /usr/share/xml/scap/ssg/content/ssg-ubuntu2204-ds.xml
    

    11. Monitoring and intrusion detection

    • Enable fail2ban to block brute force SSH attempts:
    sudo apt install fail2ban
    sudo systemctl enable fail2ban
    
    • Consider a host intrusion detection system (HIDS) like AIDE or OSSEC.

    Summary

    Hardening Ubuntu Linux involves:

    • Keeping the system patched.
    • Locking down accounts and SSH.
    • Restricting the network with a firewall.
    • Removing unnecessary software.
    • Applying AppArmor and kernel-level protections.
    • Auditing, monitoring, and intrusion detection.

    Combine these steps with compliance scans (Lynis, OpenSCAP) to measure improvements. Security is an ongoing process — monitor logs, review configurations, and adapt to emerging threats.

  • Ansible CLI

    Ansible CLI: Commands and Practical Examples

    The Ansible command line makes it easy to run one-off tasks, inspect inventories, validate playbooks, and execute automation at scale. This page is a hands-on reference with copy-paste examples.


    Prerequisites

    # Ubuntu/Debian
    sudo apt update
    sudo apt install -y ansible
    
    # Verify
    ansible --version
    

    Create a simple inventory you can reuse:

    # hosts.ini
    [web]
    192.168.0.101 ansible_user=ansible
    192.168.0.102 ansible_user=ansible
    
    [db]
    192.168.0.103 ansible_user=ansible
    

    Ad-hoc commands with ansible

    Run a single module against hosts without a playbook. Useful for quick checks and one-off changes.

    Ping all hosts

    ansible all -i hosts.ini -m ping

    Run a shell command

    command is safest. shell runs through a shell and is needed for pipes, redirects, and expansions.

    # Using 'command' (no shell features)
    ansible web -i hosts.ini -m command -a "uptime"
    
    # Using 'shell' for pipes
    ansible web -i hosts.ini -m shell -a "df -h | grep /var"
    

    Manage packages

    Use the generic package module where possible. It maps to apt, dnf, yum, etc.

    ansible web -i hosts.ini -m package -a "name=apache2 state=present" --become
    ansible db  -i hosts.ini -m package -a "name=mysql-server state=present" --become
    

    Manage services

    ansible web -i hosts.ini -m service -a "name=apache2 state=started enabled=true" --become

    Copy files and templates

    # Copy a static file
    ansible web -i hosts.ini -m copy -a "src=./index.html dest=/var/www/html/index.html mode=0644" --become
    
    # Use the template module for Jinja2 templates
    ansible web -i hosts.ini -m template -a "src=./vhost.conf.j2 dest=/etc/apache2/sites-available/000-default.conf" --become
    

    Users and authorised keys

    ansible all -i hosts.ini -m user -a "name=deploy groups=sudo state=present" --become
    ansible all -i hosts.ini -m authorized_key -a "user=deploy state=present key={{ lookup('file','~/.ssh/id_ed25519.pub') }}"

    Common CLI flags

    • -i hosts.ini choose inventory file
    • -l web limit to group or host
    • -u ansible SSH user (or set in inventory)
    • --become use sudo on remote
    • -k ask for SSH password, -K ask for sudo password
    • -f 20 set forks for parallelism
    • -v, -vvv increase verbosity

    Running playbooks with ansible-playbook

    Minimal playbook

    # site.yml
    ---
    - name: Baseline setup
      hosts: all
      become: true
      tasks:
        - name: Ensure latest updates
          apt:
            update_cache: yes
            upgrade: dist
    

    Run it:

    ansible-playbook -i hosts.ini site.yml

    Tags, check mode, and limit

    # Only run tasks tagged 'web'
    ansible-playbook -i hosts.ini site.yml --tags web
    
    # Dry run to see changes without applying
    ansible-playbook -i hosts.ini site.yml --check
    
    # Limit to a single host
    ansible-playbook -i hosts.ini site.yml -l 192.168.0.101
    

    Syntax check and diff

    ansible-playbook site.yml --syntax-check
    ansible-playbook -i hosts.ini site.yml --diff
    

    Variables and extra vars

    ansible-playbook -i hosts.ini site.yml -e "env=prod app_port=8080"
    

    Serial rolling updates

    # deploy.yml
    - hosts: web
      serial: 2
      tasks:
        - name: Restart app in batches of 2 hosts
          service:
            name: myapp
            state: restarted
    
    ansible-playbook -i hosts.ini deploy.yml

    Inventory inspection with ansible-inventory

    # Show inventory as Ansible sees it
    ansible-inventory -i hosts.ini --list
    
    # Graph view of groups and hosts
    ansible-inventory -i hosts.ini --graph
    

    Module docs with ansible-doc

    # Search for modules that manage services
    ansible-doc -l | grep service
    
    # Read the 'apt' module docs
    ansible-doc apt
    

    Configuration with ansible-config

    # Show current config values and where they come from
    ansible-config dump --only-changed
    
    # View effective config file path
    ansible-config view
    

    Secrets with ansible-vault

    Encrypt sensitive variables and files.

    # Create an encrypted vars file
    ansible-vault create group_vars/all/vault.yml
    
    # Edit later
    ansible-vault edit group_vars/all/vault.yml
    
    # Run a playbook using a password prompt
    ansible-playbook -i hosts.ini site.yml --ask-vault-pass
    

    Example usage inside a playbook:

    vars_files:
      - group_vars/all/vault.yml
    

    Roles and collections with ansible-galaxy

    # Install a role
    ansible-galaxy role install geerlingguy.apache
    
    # Install a collection
    ansible-galaxy collection install community.mysql
    

    Use them in a playbook:

    - hosts: web
      become: true
      roles:
        - geerlingguy.apache
    

    Practical examples

    1) Baseline hardening snippet

    # harden.yml
    - hosts: all
      become: true
      tasks:
        - name: Ensure unattended upgrades
          package:
            name: unattended-upgrades
            state: present
        - name: Disable root SSH login
          lineinfile:
            path: /etc/ssh/sshd_config
            regexp: '^PermitRootLogin'
            line: 'PermitRootLogin no'
            create: yes
          notify: Restart ssh
      handlers:
        - name: Restart ssh
          service:
            name: ssh
            state: restarted
    
    ansible-playbook -i hosts.ini harden.yml

    2) LAMP stack quick playbook

    # lamp.yml
    - hosts: web
      become: true
      vars:
        php_packages:
          - php
          - php-mysql
          - libapache2-mod-php
      tasks:
        - package: { name: apache2, state: present }
        - package: { name: mysql-server, state: present }
        - package:
            name: "{{ php_packages }}"
            state: present
        - service: { name: apache2, state: started, enabled: true }
        - service: { name: mysql,   state: started, enabled: true }
        - copy:
            dest: /var/www/html/info.php
            content: "<?php phpinfo(); ?>"
    
    ansible-playbook -i hosts.ini lamp.yml

    3) Fact gathering and conditional tasks

    # facts.yml
    - hosts: all
      gather_facts: yes
      tasks:
        - name: Print OS details
          debug:
            msg: "{{ ansible_distribution }} {{ ansible_distribution_version }}"
        - name: Run only on Ubuntu 22.04
          debug:
            msg: "Hello Jammy"
          when: ansible_distribution == "Ubuntu" and ansible_distribution_major_version == "22"
    

    SSH and performance tips

    • Create ~/.ssh/config entries for hosts and set ControlPersist to reuse connections.
    # ~/.ssh/config
    Host web1
      HostName 192.168.0.101
      User ansible
      ControlMaster auto
      ControlPath ~/.ssh/cm-%r@%h:%p
      ControlPersist 60s
    
    • Increase forks for large runs: ansible-playbook -f 20 ...
    • Use -l to limit blast radius during testing.

    Troubleshooting

    SSH permission denied
    Check key distribution and user in inventory. Try -u ansible -k if using passwords.

    Python not found on target
    Install Python on minimal hosts. For Debian/Ubuntu: sudo apt install -y python3.

    Module not found
    Install the required collection or role. Use ansible-doc to confirm module name.

    Playbook logic errors
    Use --check, --diff, and -vvv for verbose output. Break changes into tagged tasks.


    CLI cheatsheet

    Task Command
    Ping all ansible all -i hosts.ini -m ping
    Run playbook ansible-playbook -i hosts.ini site.yml
    Dry run ansible-playbook site.yml --check
    Limit hosts ansible-playbook site.yml -l web
    Syntax check ansible-playbook site.yml --syntax-check
    Inventory graph ansible-inventory -i hosts.ini --graph
    Module docs ansible-doc apt
    Vault edit ansible-vault edit group_vars/all/vault.yml
    Install role ansible-galaxy role install geerlingguy.apache

    Summary

    The Ansible CLI gives you fast checks with ad-hoc commands, reliable deployments with playbooks, and strong guard rails with check mode and tags. Keep inventories tidy, use roles and collections for reuse, protect secrets with Vault, and validate changes with syntax checks and diffs before you run.

  • Ansible – Configuration Management

    Ansible in Linux: What It Is, Why You Would Use It, and How

    Ansible is an open-source automation tool used for configuration management, application deployment, and orchestration. It allows you to define the desired state of your systems in simple YAML files (called playbooks) and then automatically applies those changes across many machines.


    Quick take

    • What it does: Automates system configuration, software installation, service management, and orchestration.
    • Why use it: Saves time, reduces human error, ensures consistency across environments (dev, test, prod).
    • How it works: Uses SSH (or WinRM for Windows) to connect to hosts, then pushes out instructions defined in YAML playbooks.
    • Who can use it: System administrators, DevOps engineers, security teams, and anyone managing multiple servers.

    Setting up an Ansible control node

    We’ll start with a blank Ubuntu Server box (e.g. 22.04 LTS). This machine will act as your Ansible control node.

    # Update and install Ansible
    sudo apt update
    sudo apt install -y ansible sshpass
    
    # Confirm installation
    ansible --version
    

    Create a dedicated user for Ansible operations (optional but good practice):

    sudo adduser ansible
    sudo usermod -aG sudo ansible
    

    Switch to that user and generate SSH keys:

    su - ansible
    ssh-keygen -t ed25519 -C "ansible@control"
    

    Copy the public key to any target hosts you want to manage:

    ssh-copy-id ansible@192.168.0.102
    

    You can now connect without passwords:

    ssh ansible@192.168.0.102
    

    Inventory: telling Ansible about your hosts

    Create an inventory file to list your managed nodes.

    # /etc/ansible/hosts or a project-specific hosts.ini
    
    [webservers]
    192.168.0.102 ansible_user=ansible
    
    [dbservers]
    192.168.0.103 ansible_user=ansible
    

    Test connectivity:

    ansible all -i hosts.ini -m ping
    

    You should see pong responses from each host.


    Deploying a LAMP stack with Ansible

    Now let’s create a playbook to turn a vanilla Ubuntu server into a full LAMP stack.

    ---
    - name: Configure LAMP stack on Ubuntu
      hosts: webservers
      become: true
      tasks:
        - name: Ensure apt cache is up to date
          apt:
            update_cache: yes
    
        - name: Install Apache
          apt:
            name: apache2
            state: present
    
        - name: Install MySQL server
          apt:
            name: mysql-server
            state: present
    
        - name: Install PHP and modules
          apt:
            name:
              - php
              - libapache2-mod-php
              - php-mysql
            state: present
    
        - name: Enable and start Apache
          service:
            name: apache2
            state: started
            enabled: true
    
        - name: Enable and start MySQL
          service:
            name: mysql
            state: started
            enabled: true
    
        - name: Create a PHP info page
          copy:
            dest: /var/www/html/info.php
            content: "<?php phpinfo(); ?>"
    

    Save this as lamp.yml.

    Run it:

    ansible-playbook -i hosts.ini lamp.yml
    

    Once complete, you can test by visiting:

    http://192.168.0.102/info.php

    Good practices

    • Use ansible-vault for database root passwords and sensitive values.
    • Break out web, database, and PHP configs into roles for reusability.
    • Test on staging servers before running in production.

    Summary

    With a single control node, SSH keys, and a short YAML file, you can transform a fresh Ubuntu server into a complete LAMP stack. This demonstrates the core value of Ansible: consistency, repeatability, and minimal manual effort.

  • chroot

    CHROOT in Linux: What It Is, Why You Would Use It, and How

    chroot changes the apparent root directory / for a running process and its children. Inside a chroot, the process sees the specified directory as if it were the entire filesystem. This is often called a “chroot jail”.


    Quick take

    • What it does: Runs a program with a different root directory.
    • Why use it: System recovery, building or testing packages in an isolated tree, running legacy software with specific libraries, or creating minimal sandboxes.
    • What it is not: A strong security boundary. Root inside a chroot can often break out if the environment is not carefully constrained.
    • Who can use it: Only root (or a process with CAP_SYS_CHROOT capability) can call chroot.

    Common uses

    1) System recovery from a live USB

    Mount your broken system, chroot into it, then run tools like grub-install, apt, or dnf as if you had booted it normally.

    2) Clean build environments

    Create a minimal filesystem tree and chroot into it to compile software without polluting your host libraries and headers.

    3) Legacy or pinned dependency stacks

    Run an older userland and libraries for a specific application while keeping your host modern.

    4) Lightweight sandboxes

    Offer a restricted environment for specific tasks or scripts. For serious isolation see containers or VMs.


    Security notes

    • Not a hard boundary: chroot limits the view of the filesystem but does not sandbox kernel calls. If a process gains root inside the jail, it may escape by various means if the environment is not locked down.
    • Mounts and devices: If you bind-mount host filesystems or device nodes into the jail, you can re-expose powerful host capabilities.
    • Use cases: Safe enough for building software or recovering systems. For multi-tenant or hostile workloads prefer containers (namespaces, cgroups), systemd-nspawn, LXD, or VMs.

    How it works

    The kernel changes the process’s root directory to a new path, affecting absolute path resolution. The process needs a minimal filesystem under that path, for example:

    • /bin, /sbin, /usr with the binaries you want to run
    • /lib, /lib64, /usr/lib for required shared libraries
    • /dev, /proc, /sys, /run if needed, usually via bind mounts

    Quick start: a minimal chroot

    Goal: Create a tiny root and run a shell in it. This example uses your host binaries by bind-mounting essentials. It is fine for learning, not for strong isolation.

    # 1) Create the root
    sudo mkdir -p /srv/jail/{bin,lib,lib64,usr,dev,proc,sys,run,etc}
    
    # 2) Copy a static shell OR bind-mount host tools
    # Option A: if you have busybox static
    #   sudo cp /bin/busybox /srv/jail/bin/
    #   sudo ln -s /bin/busybox /srv/jail/bin/sh
    # Option B: bind-mount host directories (simpler demo)
    sudo mount --bind /bin /srv/jail/bin
    sudo mount --bind /usr /srv/jail/usr
    sudo mount --bind /lib /srv/jail/lib
    sudo mount --bind /lib64 /srv/jail/lib64
    
    # 3) Provide minimally useful virtual filesystems
    sudo mount --bind /dev  /srv/jail/dev
    sudo mount -t proc proc /srv/jail/proc
    sudo mount -t sysfs sys /srv/jail/sys
    sudo mount --bind /run  /srv/jail/run
    
    # 4) DNS inside the jail (optional, for network tools)
    echo "nameserver 1.1.1.1" | sudo tee /srv/jail/etc/resolv.conf >/dev/null
    
    # 5) Enter the jail with a shell
    sudo chroot /srv/jail /bin/bash
    
    # Inside the jail:
    ls /
    exit
    
    # 6) Cleanup
    sudo umount -l /srv/jail/{proc,sys,run,dev}
    sudo umount -l /srv/jail/{bin,usr,lib,lib64}
    

    Tip: If you see “chroot: failed to run command: No such file or directory” it usually means the binary or one of its shared libraries is missing inside the jail. Use ldd /bin/bash on the host to see which libraries you must provide.


    Distro-native chroots that feel like a tiny OS

    Debian/Ubuntu with debootstrap

    Creates a self-contained Debian or Ubuntu filesystem tree.

    sudo apt-get update
    sudo apt-get install -y debootstrap
    
    # Create a minimal Ubuntu Noble into /srv/ubjail
    sudo debootstrap noble /srv/ubjail http://archive.ubuntu.com/ubuntu/
    
    # Bind mounts for convenience
    sudo mount --bind /dev  /srv/ubjail/dev
    sudo mount -t proc proc /srv/ubjail/proc
    sudo mount -t sysfs sys /srv/ubjail/sys
    sudo cp /etc/resolv.conf /srv/ubjail/etc/resolv.conf
    
    # Enter and finish configuring
    sudo chroot /srv/ubjail /bin/bash
    apt-get update
    # ... install packages, set root password if you wish, etc.
    exit
    
    # Cleanup
    sudo umount -l /srv/ubjail/{proc,sys,dev}
    

    RHEL/CentOS/Fedora with dnf --installroot

    # Fedora example
    sudo dnf -y --releasever=40 --installroot=/srv/fedjail --nogpgcheck install bash coreutils
    # Minimal mounts
    sudo mount --bind /dev  /srv/fedjail/dev
    sudo mount -t proc proc /srv/fedjail/proc
    sudo mount -t sysfs sys /srv/fedjail/sys
    sudo cp /etc/resolv.conf /srv/fedjail/etc/resolv.conf
    
    sudo chroot /srv/fedjail /bin/bash
    dnf update
    exit
    
    sudo umount -l /srv/fedjail/{proc,sys,dev}
    

    Good practice and gotchas

    • Always: Provide the right libraries. Check with ldd.
    • Networking: Copy or create /etc/resolv.conf in the jail for DNS.
    • Locales and time: You may need locale packages and /etc/localtime for correct formatting.
    • Permissions: You usually need to be root to chroot. Use sudo or a root shell.
    • Unmount carefully: Use umount -l if a process keeps a mount busy and you understand the risk.
    • Automation: Wrap mount, chroot, and cleanup in a small script to avoid leaving mounts behind.

    When chroot is not the right tool

    Use chroot for simple isolation and recovery. For stronger guarantees consider:

    • Containers: Docker or Podman use namespaces and cgroups for process, network, and resource isolation, far stronger than chroot alone.
    • systemd-nspawn: A light container tool that runs a directory tree with additional isolation features.
    • Virtual machines: Full isolation with their own kernels.

    Troubleshooting

    “No such file or directory” when running a binary
    Likely missing dynamic libraries, or binary built for a different architecture than the host kernel. Check with:

    file /srv/jail/bin/bash
    ldd  /srv/jail/bin/bash
    

    Networking tools cannot resolve hosts
    Populate /etc/resolv.conf in the jail, or bind-mount the host’s file.

    Cannot see disks or processes
    Mount the relevant virtual filesystems, for example proc and sysfs, or do not mount them if you want less visibility.

    Build or package tools fail
    Install compilers, headers, and build dependencies inside the jail, not on the host.


    Reusable helper script

    Handy for entering a chroot quickly and cleaning up mounts afterwards.

    #!/usr/bin/env bash
    # chroot-helper.sh - create mounts, enter chroot, then clean up
    
    set -euo pipefail
    ROOT="${1:-/srv/jail}"
    
    for d in dev proc sys run; do
      sudo mkdir -p "$ROOT/$d"
    done
    
    sudo mount --bind /dev  "$ROOT/dev"
    sudo mount -t proc proc "$ROOT/proc"
    sudo mount -t sysfs sys "$ROOT/sys"
    sudo mount --bind /run  "$ROOT/run"
    sudo cp -f /etc/resolv.conf "$ROOT/etc/resolv.conf" || true
    
    sudo chroot "$ROOT" /bin/bash
    
    # Cleanup on exit
    sudo umount -l "$ROOT/run" "$ROOT/sys" "$ROOT/proc" "$ROOT/dev"
    echo "Unmounted and cleaned: $ROOT"
    

    FAQ

    Does chroot require a separate kernel? No. It uses the host kernel. It only changes the root directory for path resolution.

    Can users escape a chroot? Non-root users are usually contained, but root inside the jail can often escape if given enough tools or mounts. Do not rely on chroot as your sole security boundary.

    Is pivot_root the same? No. pivot_root switches the root of the calling process during boot or within namespaces. It is commonly used by initramfs and container runtimes. chroot is a simpler userland tool.


    Summary

    chroot is a simple, powerful way to run commands in an alternate filesystem tree. It shines for recovery and clean builds, and it is useful as a lightweight sandbox. It is not a full security solution. For strong isolation use containers or VMs. For the common admin tasks described above, a neat chroot will save you time and risk.